Showing posts with label Photoshop tutorials. Show all posts

Wednesday, June 2, 2010

How To Adjust A White Balance of a Camera Raw File

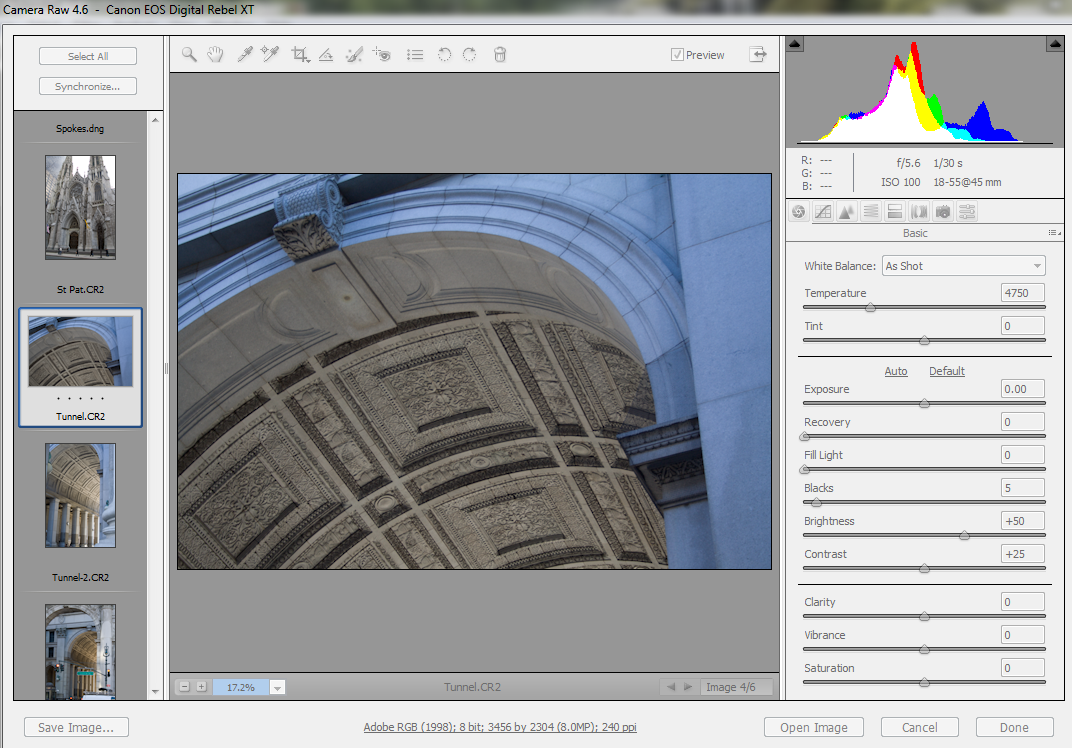
In today's tutorial,  I'm gonna show you a very simple way of how to adjust a white balance of a photo in camera raw file. A white balance is the temperature of the light at what time this image was shot. As for this, I know it was shot in a cloudy day in New York city. That's why it's very cool so what we want to do is to warm it up to the right temperature. Here is a camera raw photo I'm gonna use:

Step 1:

In adobe photoshop CS3, go to File --> Open to open your raw photo.

You should see camera raw dialogue box


Step 2:

On the right side, change the drop down white balance to whatever your image was shot in. In this case, I chose Cloudy. Camera raw does a pretty good job for this but it's not correct yet.


Step 3:

On top, click on White Balance Tool or (Ctrl+Alt)+I and click on the portion of your image where you think has neutral color. For instance, I know the right top wall has a neutral gray color.So by clicking on that, the image will look warmer.


However if you think it's still not enough, you can slide the temperature or tint to your preference. Once satified, click Done. That's it.

By now, you can see how easy it is to deploy Camera Raw to adjust your photo to a better white balance and better photo.

Saturday, May 22, 2010

How to create a single image from different exposure using HDR in Photoshop

Suppose you have a couple of exact same photos with just different exposure levels and you want to make a single photo by merging and capturing both the highlight and the shadow of all those photos together using the powerful high dynamic range (HDR) tool in Adobe CS3. Ok, let's get started. Here are the photos I'm going to use:


Step 1:

We're going to merge these photos together. So in Adobe photoshop, go to File --> Automate --> Merge to HDR... and then browse to all your photos and click Ok twice. You should see the Merge to HDR dialogue box pop up.


You now have the ability to take the photograph and either turn them on or off depending on your personal preference. You can also set the white point preview on the right hand side and I'm gonna turn it down a little bit simply because the fact that we're losing a lot of details of the tree behind.

Step 2:

Once satified, click Ok. Photoshop will create a new file based on the High Dynamic Range photograph that we've just created.


Here you can see how unbelievably powerful this HDR tool is as long as you take the correct exposure with your camera. By utilizing HDR, you have maintained most of the details of the window and all the details throughout the entire room.

Wednesday, May 19, 2010

How to create a panoramic photograph

Today I'm going to show you how to create a panoramic image using the easiest and effective way by utilizing the crop tool inside Adobe CS3. So I'm going to use this photo:


Step 1:

Open File --> Open As or double click on the Adobe photoshop workspace, select the photo you want and click Open.

Step 2:

Select Crop tool or (Ctrl + Shift) C and make a selection across your image and position it to where you want your image to be, based on your preference.


Hit Enter and you should get a nice fake panoramic image you want. To make it even better, I'm going to add a border.


Step 3:

To add border, go to Image -> Canvas Size or (Alt+Ctrl+C). Canvas Size dialogue box should pop up. Switch both width and height to percent and make sure a relative box checked.

Now set the value of the border to whatever you like but I'm gonna set width to 10 and height to 10. Make sure the background is black and click OK. Done!!! There you have it, very nice cool panoramic image.

Sunday, January 31, 2010

How to make a header image using Photomerge

Suppose you have a couple of photos shot from different angles and you want to create a banner by blending them all together. Today I am going to show you how to do this using Adobe Photoshop CS3. Let's get started.

Here are the photos I am going to use:


Step 1: 
Open File -> Scripts -> Load Files into Stack and load Layer dialogue box pops up. Browse to any files you want to use then click OK. You should see in the layer panel the picture you have stacked.


Step 2:
Now we got all our objects loaded into the stack here, we are going to attempt to stitch them all together using photomerge in adobe CS3. So select all the photo layers (Ctrl+Click/Shift+Click) to select more layers and go to Edit -> Auto-Align Layers. Now this is gonna bring up Align dialogue box. Choose Auto -> ok. This is what you should see.


Step 3:
What we need to do now is to get rid of the transparent area on top and the bottom and we also need to get rid of these themes here in the middle. Here I'm going to use crop tool and select the image area.


Once satisfied, hit Enter


Step 4:
As you can see, there is still significant problems here with the tonality of this image. We could fix by adjusting opacity setting and level adjustments and stuff but Photoshop has a really nice built-in feature that allows us to blend images together. To do this, go to Edit -> Auto-Blend Layers. Photoshop will perfectly blend these 3 images together.


There you have it. It's simple, easy and nice looking banner.

Adobe Photoshop CS3 Video Training Course for Beginner Adobe Photoshop CS3 Extended Tutorial Training in 3 DVDs By KeykoPhotoshop Video Tutorial
Mastering Photoshop Elements 5.0 Basic Training TutorialPhotoshop Elements Basics: How to Edit, Fix, Enhance & add Artistic Effects to Your Digital PhotosAdobe Photoshop Elements 8
 

Followers

Tips Of Geek Copyright © 2009